This is the second time I have opened up this hive and been attacked by the bees. It's certainly a hot hive. I am okay walking around the hive, but as soon as I go in to it all hell breaks loose. I smoked the bees and walked away. Something about taking the honey box off they didn't like that. I think it's justified with the response I got.
 |
| Bee Hive on the Right is that one that I worked on |
It's been since early August since I have really opened up this bee hive. I have not done anything to this hive other then put a new frame in it a couple weeks ago. Since I don't have anything to really do no reason to go into the bee hive. I found out by looking inside that the bees have made honey comb on the top side of the frames in the brood chamber (Super) and connected it to the Super frames above. I have 2 supers. 1 brood and 1 honey. I suspect it's pretty much honey in the bottom super. They've attached honey comb to the wall and the 1st frame next to it. I don't really care how they keep the house at this point in time. Next Spring I will do a complete frame swap in the bottom to get things organized and on the right path with proper order. The disorganization is only in the brood chamber. The honey super is new frames since I put it on. If your not familiar with the read on the bee hive, this was the hive in May that I rescued. I ended up cleaning up some of the original comb, but it's a mess, Oh well all is okay for now.
 |
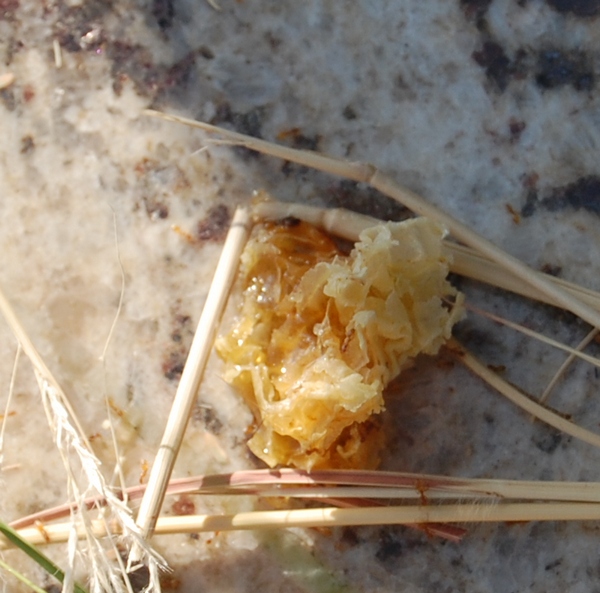
| This is some burr or trash comb I removed. |
This is what happened. I got a bunch of bees in my face when I lifted the first box off the bee hive and onto the stand. This as I said before was because the separation of the burr comb that was on top of the frames. Probably some lifting and dropping of the frames or rattling when this happened and the bees came out at me. The bees temperament previously was fine back in August and now it's a "HOT" hive meaning anything you do with them, they come out at me. This I suspect is because the hive beetles that have gone into the bee hive. Grumpy bees are justified and I understand.
After I got the top box off the bottom box separating the 2, I placed the bottom brood chamber onto the new bottom board
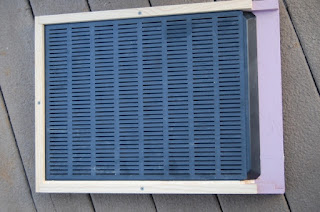 |
| West Beetle Trap with modifications |
|
|
with the beetle trap. I then had to walk a block away because the amount of bees swarming me. Unfortunately I had a delivery truck arrive. He got the pallet off the truck and promptly got inside his truck and drove off. He didn't like the bees flying around me or him. I then went back with the smoker and smoked them. I lifted the brood chamber off the existing bottom board and placed it on the beetle trap bottom board. Placed the honey box on the brood chamber and walked away. I managed to grab the bottom board and place it on the firewood shed roof where the bees can clean up the honey that dripped down on it. About 10 minutes later I returned and strapped the bee hive down securing it. I then proceeded to walk to my shop where I was safe and could get the bees to stay outside while I was inside. About 5 minutes later I was able to go inside to my house. No bee stings.
 |
| Hive Tool used to scrape the burr comb and loosen the bee super(Boxes) apart from each other for removal and transfer |
|
|
|
Wooden shim I had to make for the beetle trap.
 |
| Beetle trap grate modification Before (Upper photo) | | |
 |
| 45 degree angle cut on the lip of the grate (AFTER MODIFICATION) |
I had to modify the bottom board to fit the West beetle trap. I had to cut a 1" piece of wood that was 3/4" wide. I had to notch that piece so the tray would slide into the wood shim. Under that grate is vegetable oil. Just enough to coat the bottom about 3/16" probably or 1/8" Enough for the beetles to drown in and die. On that grate I cut a 45 degree angle on the front of it cause it had a lip on it. This is what I was talking about in the blog I wrote yesterday. Poorly made. I shouldn't have to cut and sand the front grate to make a smooth transition. I have watched video's where the hive beetles like to follow tracks or grooves. Why would they not recess this as they did the 3 sides is dumb.If you have to clean it out you have to pull the whole tray out, so what's with the tray not being recessed is just laziness. On the shim piece of wood on the left I wanted to round that piece so they wouldn't hang out on that gap. I want them to go into the grated part. I cut a small piece of wood and sanded it with an electric sander so it's got a curve.
Hope for the best is what I am doing. I suspect they'll make it through this beetle problem. Bee Hive#1 I will see how they are doing and if I need a beetle trap for them. They have a screened bottom board with out an oil tray.


No comments:
Post a Comment